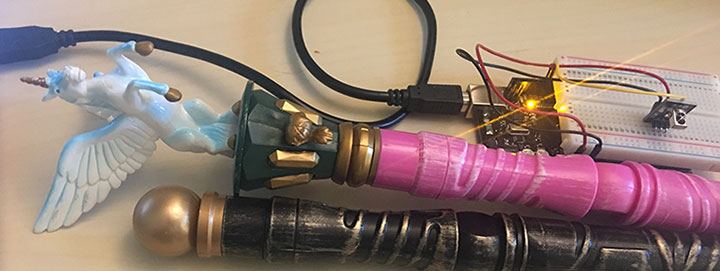
Apologies for the delay. I’ve been meaning to update the original post talking about Magiquest wands and home makerness, but haven’t had time until now.
I did manage to find an improved tactic to the statistical confidence path I went down using only a Raspberry Pi and LIRC to decode. The hero of this story is really Michael Flaga, who extended Arduino-IRRemote to include Magiquest wands as remotes. His awesome library can be found on github.
But, first things first…
Wiring Up The Arduino
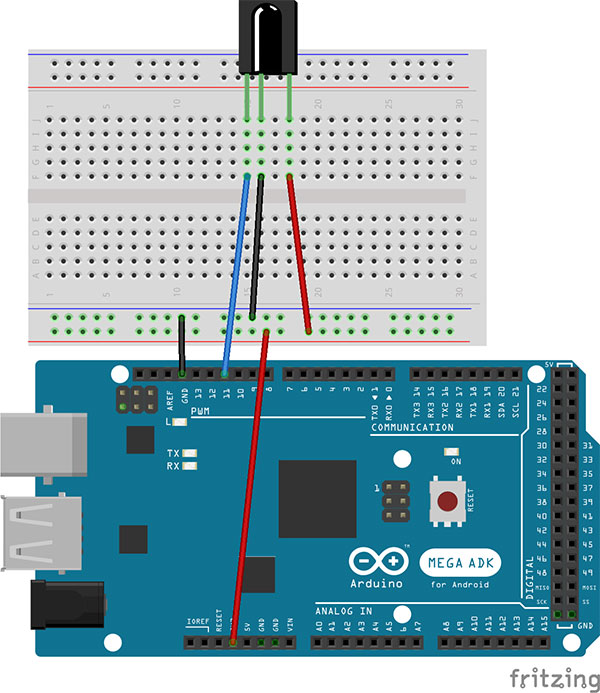
None of this will work without an IR sensor. So, the first task is to get that wired up.
It’s only important to remember that the Ground goes to ground, the Voltage goes to +3.3v, and the Signal goes to Pin 11. You could use a different pin, but the default configuration should work fine. I used a SainSmart Mega 2560, but you could use most any Arduino you have laying around. You’ll be wanting to connect your Arduino to a machine to receive the decoded output, so a USB cable will help. I ran my USB cable to a Raspberry Pi so the whole unit could sit on top of my kids’ dresser.
Talk To Me, Goose!
With the decoding of the Magiquest wand being handled by mflaga’s library, the critical component of the system becomes communication with the downstream platforms. First, make sure you have the Arduino-IRremote-master Library loaded into the IDE. While in Arduino, select Sketch > Include Library > Add .ZIP Library and select the zip file downloaded here. After that, make sure you’ve gone to Tools > Board > Board Manager and selected the right board. Mine compiled best under Arduino AVR Boards 1.6.9. That should avoid most of the compile errors I saw under other versions.
I began by loading IRrecvDump onto the Arduino and writing a basic Python program to read the output. The Python code looks like this:
import serial

ser = serial.Serial('/dev/tty.usbmodem1421', 9600)

while True:
	s = ser.readline();
	print s;
Note: you may be operating on a different tty. To find the exact location of your Arduino, type
ls /dev/tty*
and look for the unusual usb port. That’s the one you want. Also, if you haven’t already, you may need to install pySerial by typing
pip install pySerial
At this point, you should be able to fire up the Arduino, start the python script shown above, and get a response when you flick your wand at the IR sensor. But, it probably comes out “Decoded – Magiquest, magnitude = X, wand_id=Y…”, etc. The challenge is to be able to do something with it.
Now, You’re Speaking My Language
So, you could certainly parse what’s being returned from the Arduino as is, but in order to make it more useful, let’s get the Arduino to output something more universal, like JSON. So, back to the Arduino sketch.
We’ll need to teach the Arduino some new tricks to construct our JSON. Fortunately, there’s a library for that, too. Benoit Blanchon has written the ArduinoJSON library that you should go ahead and download. We’ll import it the same way we imported Arduino-IRremote above. Make sure to include it in your project so the top of the Arduino sketch looks like this
#include <ArduinoJson.h>
#include <IRremote.h>
Next, we need to set a buffer for our JSON and create the JSON object. Add this just below your declarations
StaticJsonBuffer<200> jsonBuffer;
JsonObject& root = jsonBuffer.createObject();
Since we’ll be decoding the output as JSON on the receiving end, the next thing to do is update the “Starting…” message to be formatted correctly. Update your setup() block to look like this:
<code class="language-cpp">Serial.begin(9600);
Serial.println("{\"message-type\":\"initialize\",\"message\":\"starting...\"}");
//Serial.println('starting...');
Next, we want to remove the extraneous printing from the ENABLE_MagiQuest loop and let the Python code know a wand message is coming through, so update that code to look like this:
#ifdef ENABLE_MagiQuest
  else if (results->decode_type == MAGIQUEST) {
  #ifndef IS_AVTINY
    root["message-type"] = "wand";
    //Serial.print("Decoded MAGIQUEST - Magnitude=");
    //Serial.print(results->magiquestMagnitude, HEX);
    //Serial.print(", wand_id=");
Notice I commented out the Serial.prints and changed the message-type to “wand”. Now, the actual data dump happens in the ENABLE_RCMM block, so that’s where will update next. We want to stop all the raw code printing and construct the rest of our JSON object. Update that block to look like this:
#ifdef ENABLE_RCMM
  else if (results->decode_type == RCMM) {
     Serial.print("Decoded RCMM: ");
  }
  root["owner"] = "Undefined";
  root["message"] = "";
  if(results->value==0x10CF2401){
    root["owner"] = "Ellie";
  }
  if(results->value==0x1B9BA421){
    root["owner"] = "Edison";
  }
  if(results->value==0x11911A81){
    root["owner"] = "Dad";
  }
  root["wand-id"] = String(results->value, HEX);
  root["bits"] = String(results->bits, DEC);
  root["magnitude"] = results->magiquestMagnitude;
  root.printTo(Serial);
  /*Serial.print("Raw (");
  Serial.print(count, DEC);
  Serial.print("): ");

  for (int i = 0; i < count; i++) {
    if ((i % 2) == 1) {
      Serial.print(results->rawbuf[i]*USECPERTICK, DEC);
    }
    else {
      Serial.print(-(long)results->rawbuf[i]*USECPERTICK, DEC);
    }
    Serial.print(" ");
  }*/
  Serial.println("");
#endif //ENABLE_RCMM
}
I set the owner to undefined up front, but update it if I find the HEX code for a wand I know. I got this from printing the values from the dump and just put in if statements. You could probably do this on the Python side or even register them in a database and pull them from there, but this was quick and dirty. I set message to an empty string, but you could potentially pass other things as well, if you needed to. I appended the wand-id, the number of bits in the signal, and the magnitude of the flick, which is passed with the remote signal. After that, I commented out the block that was the raw output from before.
The last thing to do is to update the loop() block to spit out our JSON rather than the raw code. Update it to look like this:
void loop() {
  if (irrecv.decode(&results)) {
    //Serial.println(results.value, HEX);
    dump(&results);
    delay(250);
    irrecv.resume(); // Receive the next value
  }
}
That’s it. Compile the code and upload it to your Arduino. Next, the Python.
I Hear Ya
Now, we need the Raspberry Pi to listen for the wand codes and do something in response. I decided for testing sake, to open different web pages based on which wand was being used. User your favorite text editor and create a script like this:
import serial
import json
import time
import webbrowser

ser = serial.Serial('/dev/tty.usbmodem1421', 9600)

while True:
	s = ser.readline();
	#print s;
	#print len(s);
	j = json.loads(s);
	print j['message-type'];
	if j['message-type']=="wand":
		print j['owner'];
		print j['wand-id'];
		if j['owner']=="Dad":
			b = webbrowser.get();
			b.open_new('http://devinhenkel.com');

		if j['owner']=="Ellie":
			b = webbrowser.get();
			b.open_new('https://scratch.mit.edu/users/ScratchUser/');
So, I’m just parsing the JSON and printing the message-type. If the message-type is “wand”, I check to see who the owner is. If I recognize the owner, I’m opening different URLs in the default browser. I saved the file as wands.py and ran it from the terminal with the command
python wands.py
Once I did, I saw the “initialize” message-type print to the console. Waving the different wands at the Arduino opened different URLs in the browser. Success!
Beyond The Browser
What I ended up doing was buying a WeMo Switch and setting up a WeMo Server on the Raspberry Pi. Using curl, I was able to ping the server when I recognized the wand and used it so the kids could turn the Christmas tree on and off with the wands. The possibilities are really limited only by your imagination.
I’m working on setting up multiple sensors and giving them each an ID. That way, I can pass the JSON to a Node.js server and have it centrally manage the interactions. I recently got an Amazon Echo for my birthday, and I’m thinking about setting up an Alexa skill to cast a spell. That way, the kids can tell Alexa what spell they want to cast which will set a property in a cloud database, then when they flick the wand the Raspberry Pi can read that property and react differently depending on the spell cast.
Sorry it took me so long to post this. I’ve put the full Arduino sketch and Python script here if you want to use it as a starting place.


